Morning Dolls,
As I prep my mind for Fall and the projects that ensue, I cant deny my obsession with jumpsuit. While scanning on of my favorite online retailers (www.shopbop.com) I came across a jumpsuit that literally took my breath away!
As stated this is a 10 Crosby Derek Lam jumpsuit retailed at a whopping $595!
While there are several different methods to construct this look, I have put together the following patterns to guide in the right directions.
BOTTOM
To accomplish this bottom you will need to decide where you want your zipper/buttons.
The first option would be in the middle. this is likely the method used as I am unable to spot any zippers on the sides in the picture. The ties in the front may very well be hiding the zipper/buttons. In this case, I would use M6756 View A (my go to pattern for pants). While M6756 is obviously a shorts pattern, the fit of this pattern is unmatched in any pants pattern (in my opinion). Drafting these into pants is very, very easy!

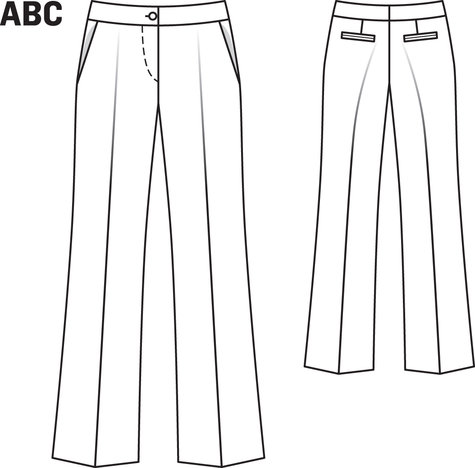
The Second Option for the bottom with the zipper/buttons in the middle would be Burda Pattern #118B found Here. These slacks have the exact shape and most important the back pockets of this jumpsuit. If you like downloading PDF patterns, this may be a great option.

If you dare to put your zipper in the side seam and conceal it between the bust and waist, you may opt for M6930 View A. Same as M6756, this pattern can be drafted into pants very, very easlily.

TOP
To accomplish the top, I have selected the following pattern: M6844 View A

View A has a long enough torso to give this jumpsuit the ease it needs for functionality. the sleeves can be widened by 2 inches and an added bias for the wrist. For the collar, use the collar piece from view D and add 12 inches (6 on both ends). This will give you a long enough tie to knot in the front. As for the construction....The attachment of the collar should stop at the bust line. the opening of the shirt below the bust line should be prepped for your zipper/button (if using M6756 or Burda 3118B) or sewn closed from the bust to the waist (if using M6930).
This would be an easy option for a beginner, if wanted to simulate the button up shirt effect, you can also opt to use Vogue Pattern 1389

For this pattern, you will need to draft the collar into a lapel and with a separate collar and separate button/zipper casing at the bottom....
Can you see it??????? Let me know your thoughts? I am DYING to try this idea!
Happy Sewing!
Muah
-J


We like how your mind works!
ReplyDeleteThank you! I am looking forward to putting this idea to work!
Delete